

When installing corrugated siding, you’re likely to need to install trim over a window or doorway. You will do so by using either head trim or jamb trim.
In this article, we will go over the difference between the two and how to install them for a window application for your project.
We’ve made you an instructional video to guide you further.
This article is intended to support the video. Follow the instructions within the video and refer back to this article if you need a written copy of the instruction.
Head Trim and Jamb Trim
Both head trim and jamb trim may appear the same in many ways. Both contain a color on the outside and primer on the inside.
However, the main difference is that jamb trim comes with a return on the hem side which conceals any primer from being seen when installing vertical corrugated siding.

Jamb trim is the best choice for vertical siding applications, but your layout must be planned properly. If the high seam of your panel lands where the return of your trim is located, the return will prevent the panel from inserting into the trim. If this happens, you’ll need to use head trim or use duck-billed clamps to carefully hem down the return leg of the trim.
If you are running your panels horizontally, jamb trim cannot be used because the return leg will prevent the high seams from inserting into the trim.
Measuring for Head and Jamb Trim
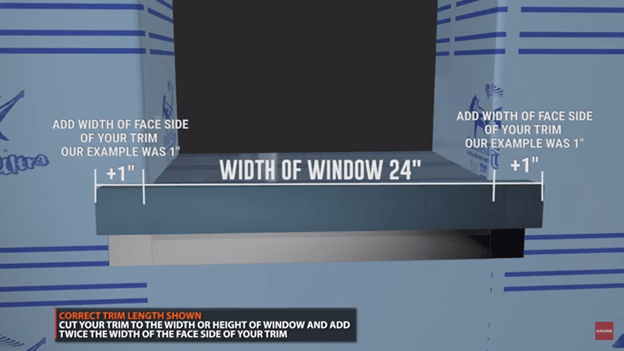
Your first step is to measure out your windows. However, you will need more trim than the actual measurement of the window.
The rule of thumb is that you will need 2 times the width of the face side of your trim.
To compensate for the extra material needed:
- Start with a 45-degree line.
- Mark a straight line across all sides from this line.
- From this straight line, measure out the distance of trim needed.
- At this mark, draw a straight line across all sides.
- Next, on the face side of the trim, mark out a 45-degree line.
- From this mark, draw a straight line across all sides.
Marking a 45-degree line at the beginning and the end of your measurements will give you the additional material you will need to join the sections of trim.
Cutting and Preparing Head and Jamb Trim
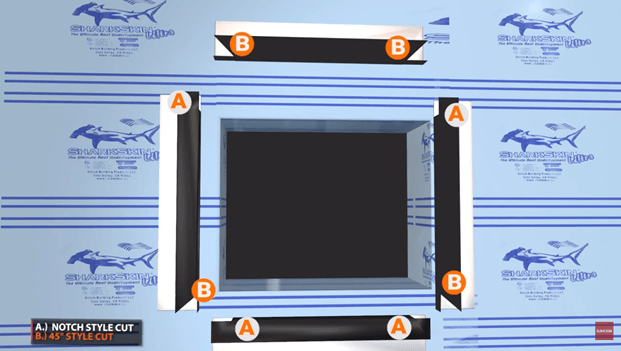
There are two types of cuts or finishes you will need for this: Notch Cut and 45-Degree Cut.
Creating a Notch Cut
- On the side of the trim, cut up to the first mark on each side.
- Using metal cutting snips, cut out the remaining tab.
NOTE: Instead of using metal cutting snips, you can also fold the tab repeatedly until it breaks off. This method usually leads to a nice clean edge.
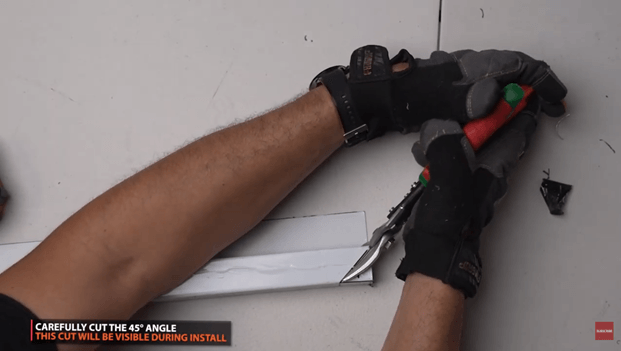
Creating a 45-Degree Cut
- Using the marks you made during measuring, cut the 45-degree line on the face side of the trim.
- Notch cut the two sides of the trim.
- Pry open the hem of the 45-degree tab.
These two types of cuts will be applied to the sections of trim seen below. Areas marked “A” will be notch cut, and those marked “B” will be cut in the 45-degree style.
Installing Head and Jamb Trim
- Start with the bottom section. Fasten with pancake screws 12 inches on center.
- Next, install the 2 sides of the trim. Make sure the trim goes over the lower section of trim.
- The 90-degree tab should tuck into the lower trim. The lower section of trim should go into the open hem of the 45-degree cut.
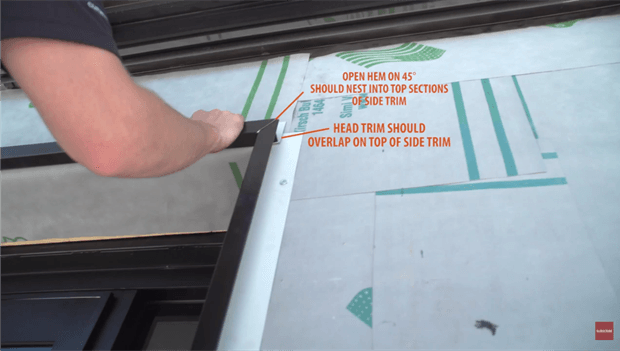
- Install the top section last. It should go over the side sections. The open hem on the 45-degree cut should next into the top sections of the side trim. Head trim should overlap on top of the side trim.
- Bend the tabs downward 90 degrees.
- Fasten the head trim with pancake screws 12 inches on the center.
Looking for more metal roofing installation videos? Go to our YouTube Channel and subscribe as we post new installation videos weekly.
Buy Manufacturer Direct and Save
Looking to save some cash on your metal roofing project? Western States Metal Roofing is a manufacturer that sells direct to homeowners and contractors, saving you money on all of the metal roofing materials you’ll need for your house.
Go to the Western States Metal Roofing website to see our products and request a quote or a metal color sample, as there are hundreds of colors to choose from.