

At Western States Metal Roofing we talk to thousands of people just like you. We get asked questions about fastening metal roofing on a daily basis. This blog will walk you through the best practices for screw placement on several different types of metal roofing.
We will explain:
- Where to place screws for ⅞” Corrugated
- Where to place screws for R Panel or PBR Panel
- Where to place screws for 7.2 Panel or Western Rib
- Proper spacing between screw lines
- How to determine the proper quantity of screws needed
It is easy to determine where the screws should be located on your metal roofing panel. Every panel will have a different screw placement diagram. These will be located within the installation guide. First, we will review the screw placement for the most common metal roofing panels, starting with ⅞” corrugated.
If you enjoy this article then we recommend that you read these also: Installing A Metal Roof With Fastening Screws [Stop Metal Roof Leaks]

What Is The Screw Pattern For ⅞” Corrugated Metal Roofing?
The screw placement for ⅞” corrugated can be a little tricky. The fasteners are located in different locations for roofing and metal siding conditions. Then if that wasn’t confusing enough metal roofing manufacturers have differing opinions on the correct corrugated screw placement for a roofing condition. Hang in there and we will explain this one to you in detail.
Just in case you are a visual learner we created this easy step by step video also.
There are two schools of thought when it comes to corrugated metal roofing screw placement. Both are correct.
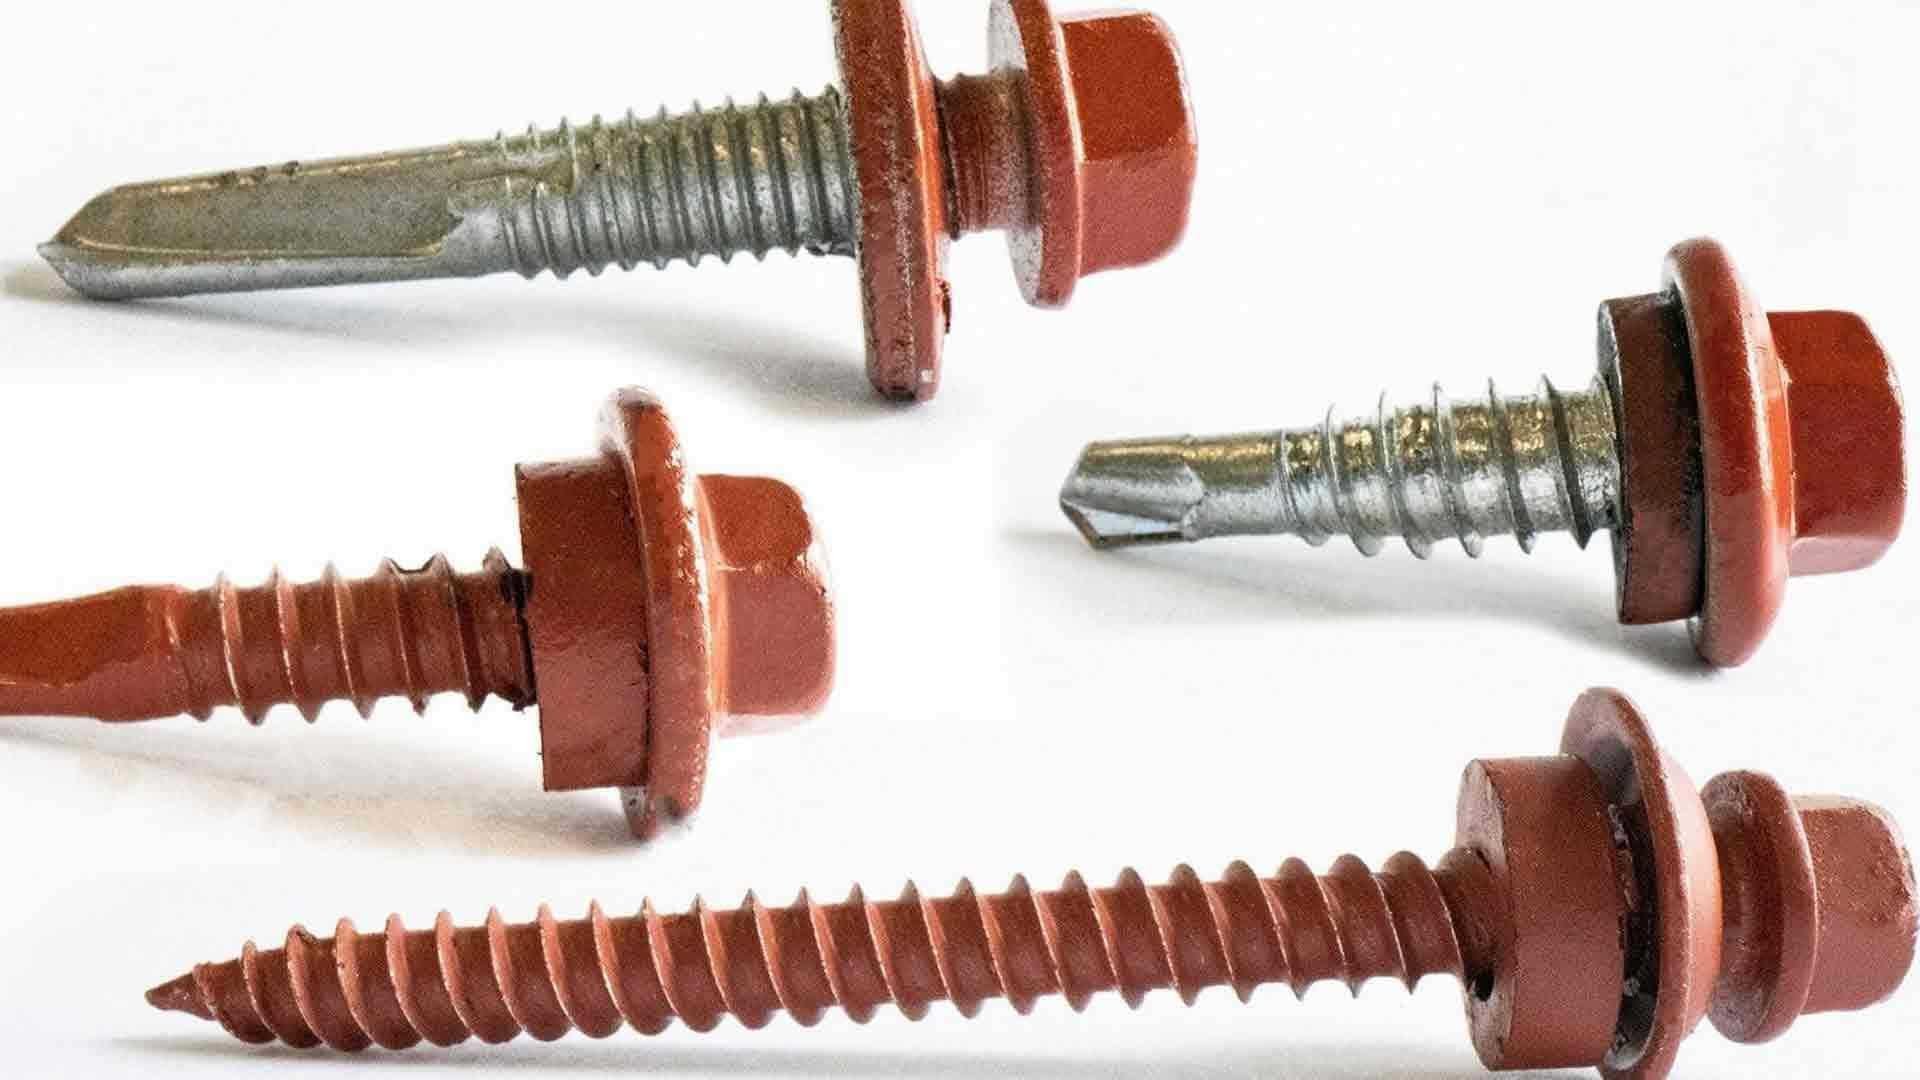
- Installing the metal roofing screw in the high of the corrugated roofing panel as shown below. The advantage to this method is the screws are exposed to less water and debris. The main disadvantage is a less secure connection.
- Screws that are installed in the low of the metal roofing panel will result in a more secure connection, but will be less weather-tight. The screw will compress better when attached in the low and you are less likely to distort the metal roofing panel when you tighten the screw.
If the fastener is placed in the low of the panel it partially obstructs water and debris. The low of the panel is skinny and the fastener takes up most of that space. As the water drains it will go over the screw. Screws that have backed out over time or that were installed incorrectly will leak. You will avoid the bulk of this issue by installing the fastener in the high of the roofing panel.
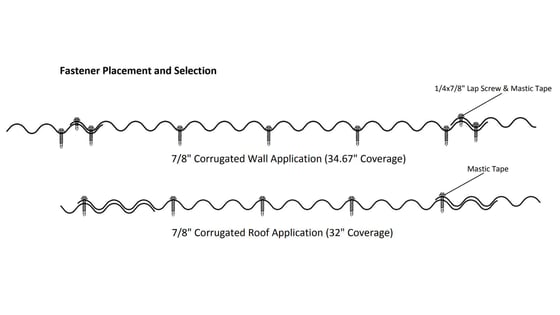
⅞” Corrugated Screw Location For Metal Roofing
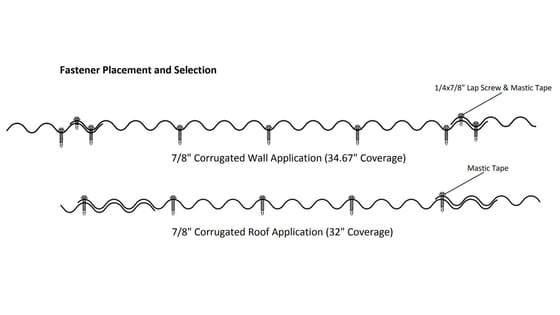
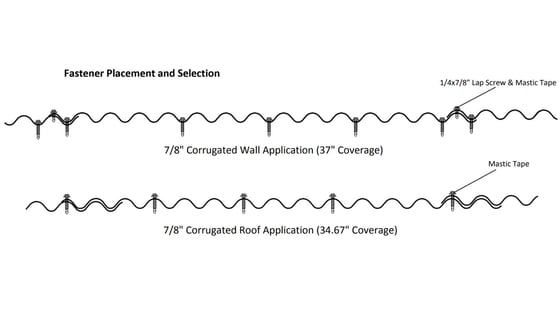
A screw line is a row of screws that is spaced at a specific distance from the next row of screws. There will be four screws per screw line placed in the high of the corrugated panel. The screws are spaced out so that every third corrugation has a screw. The diagram above is a typical 37” wide panel and the spacing works out perfectly. However, sometimes corrugated sheets are 39” wide instead of 37” wide. When this happens it creates an additional corrugation. You will still need four screws per sheet, but in one location it will be at the fourth corrugation as shown below.
What Is The Correct Panel Side lap For ⅞” Corrugated Metal Roofing?
One of the screws must be located where panels overlap as shown in the above diagrams at the far right. During the installation and prior to lapping the corrugated metal roofing double sided mastic tape should be placed on the corrugated sheet as shown in the video below.
⅞” Corrugated Screw Location For Wall Panels Or Metal Siding
There will be five panel screws and one lap screw per screw line. The lap screw is the screw that sits in the high and it is designed for a light gauge metal to light gauge metal connection. Lap screws are spaced 12” to 18” on center. The panel screws are spaced out so that every third corrugation has a screw including both sides of the panel sidelap. When the corrugated sheeting is 39” wide instead of 37” wide the screw placement will be slightly different as shown in the diagram below.
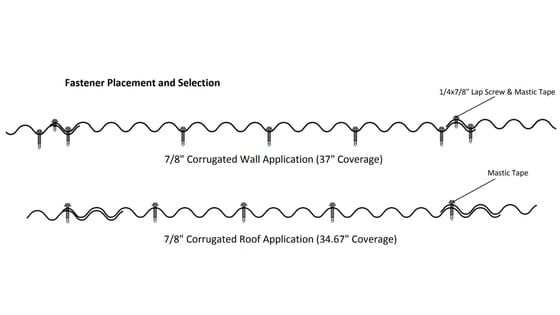
Downloadable Screw Location Diagram [39" Wide]
We recommend that you use double sided mastic tape at the panel sidelap for a wall condition also. The mastic tape will make the panel more weathertight. Mastic tape is always used for a metal roofing installation. On a wall application, mastic tape is shown in our installation guide and we do recommend that it’s used. The reality is many installers choose not to install the mastic tape for wall conditions.
Trim For Corrugated Metal
If you're learning about how to screw down a metal roof then there's a good chance you will need help installing the corrugated metal trim or the corrugated metal panels. Our easy to navigate Metal Roofing Learning Center has step by step installation videos for all of your corrugated trim installation details.

What Is The Correct Screw Pattern And Spacing For R-Panel Metal Roofing And Metal Siding Panels?
The screw placement for R-Panel is straight forward. The screws are located in the same location for both metal roofing and metal siding applications. One item of importance is that you will have additional screws at the ends of the panels. This lessens the likelihood of strong winds ripping the panels off of your building.

Downloadable Screw Location Diagram For R-Panel
There will be five panel screws and one lap screw per screw line at the panel ends. The remaining interior panels will have three panel screws and one lap screw at each screw line. Pay close attention to the diagram above in which the top left is circled. This is blown up larger and shown in the diagram as detail “AA”. You must attach a panel screw in this exact location. In addition, there are lap screws that are connected at 12” to 18” on center and butyl tape seal, which is the same thing as mastic tape.
What Is The Correct Screw Pattern And Spacing For 7.2 Panel/Western Rib?
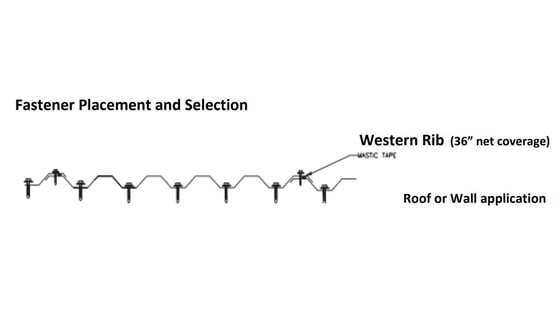
Screw Location For 7.2 Panel/Western Rib
The screw placement for 7.2 Panel and Western Rib is simple. Panel screws are located in every panel low. There will be five panel screws and one lap screw per screw line. Lap screws are connected at 12” to 18” on center and butyl tape seal is used at the panel sidelap.
How Often You Screw Down A Metal Roof?
Figuring out how the correct distance from screw line to screw line is an easy process. It will depend upon whether the metal roofing is installed over a solid wood substrate or over metal purlins. Each of these conditions will lead to different distances between the screw lines. After you have your screw line spacing it will be simple to determine how many screws to purchase.
Screw Line Spacing For Metal Roofing Sitting On A Solid Wood Substrate
When you are trying to determine screw line spacing you have to realize that each job is different. Some jobs are located in areas that have high winds while others may be located in snow country or a desert. For this reason the spacing between screw lines should be determined by the engineer. However, this rarely happens.
In the real world the homeowner or installer chooses a distance without consulting an engineer. The overwhelming majority of the jobs we sell are installed with screw lines at 24” on center. Jobs that are not installed at 24” on center are usually at 18” O.C. if closer and up to 36” O.C if further. When in doubt more attachment is better than less attachment.
Screw Line Spacing For Metal Roofing Over Metal Purlins
This will depend upon the type of panel that is used and the thickness of the steel. An engineer will use a load chart in order to determine the spacing between metal purlins. Once the purlin spacing is determined then the metal roofing panels are typically attached to every line of purlins. If the purlins are really close it might be possible to attach the metal sheeting at every other purlin. However, that would be a decision for the engineer.
How Many Screws Will I Need For My Metal Roof?
The vast majority of the jobs that we sell are fastened at 24” on center (O.C.). Therefore, we will base this answer upon 24” O.C. screw lines. If your screw lines are closer or further than 24” O.C. you can make some adjustments based upon this formula. We are also referring to these specific 36” wide panels: ⅞” Corrugated, R Panel or PBR Panel, and 7.2 Panel or Western Rib.
Formula For Determining How Many Screws Will Be Needed
Here are two easy formulas for determining the amount of metal roofing screws:
- Take your square footage and multiply it by 80%.
- 80 screws for each roofing square. A roofing square is 100 square feet.
Example: 3,000 square feet X 80% = 2,400 screws
Example: 30 roofing squares X 80 screws = 2,400 screws
Do Not Forget To Order Metal To Metal Screws For The Trim And Panel Sidelap
-
- You will need one lap screw for each lineal feet of trim or flashing
- Screw count for panel sidelap is determined by dividing the square footage by three and then dividing again by 1.5.
Example: 3,000 square feet divided by three (width of panel) = 1,000 then divide that by 1.5 (spacing O.C. of sidelap screws) = 667 screws
You don’t need metal to metal screws for the sidelap if using ⅞” Corrugated. You will only need sidelap screws for R Panel/PBR Panel and Western Rib/7.2 Panel.
What Is The Most Common Cause Of Metal Roof Leaks?
The single biggest cause of leaks on a metal roof is due to incorrect fastener installation. Once you learn about screw placement we recommend that you learn how to install the fasteners correctly. Your roof will have thousands of screw penetrations and watching this video is the best thing that you can do to prevent roof leaks.
If you prefer to read about installation of metal roofing fasteners we wrote you an article:
How To Properly Install A Metal Roof With Fastening Screws
More Resources On Metal Roofing Installation
Screw placement for metal roofing and siding panels is easy. After you view the videos and diagrams in this article you will not have any issues. If you are learning about screw placement then the next steps is to learn more about fastening the metal sheeting and trim and flashing installation. An excellent starting point would be to view our installation guides or watch our installation videos.
The first piece of trim that will be installed on your metal roof is the eave trim.
We created an EASY step by step installation video to make your metal roofing installation as simple as possible.
Discover which type of fastener is right for your metal roof installation by reading:
Choosing The Right Screw For Your Metal Panels