

One of the main functions of a standing seam roof is to keep a structure free from leaks. A critical step to preventing leakage is to install the roof’s ridge caps correctly.
Western States Metal Roofing has the expertise to help with this. We’ve created step by step written instructions and pictures that illustrate each step on installing gable trim.
This article is intended to support the video. Follow the instructions within the video and refer back to this article if you need a written copy of the instructions.
After your standing seam panels have been installed, your next step is to install your gable trim. For a complete guide to installing standing seam panels, watch this video for reference.
In this article, we will guide you through the process of installing a three-piece gable detail.
First, though, it’s important to point out that this installation is recommended for professional installers as a three-piece gable detail is more difficult to install than a four-piece. If you are a homeowner, a DIYer, or you don’t have any roofing experience, we recommend you watch our four-piece gable installation video here.
In this article, we will guide you through the following steps:
- Laying out your gable trim
- Installing receiver trim
- Installing a trim cleat
- Preparing your gable trim at eave
- Overlapping gable trim
- Preparing gable trim at peak
- Fastening gable trim
For this installation, you will need the following materials:
- WS-401 Trim Cleat
- WS-435 Gable Trim
- WS-430 Receiver Trim
- WS-460 Fascia Trim
- #10 Pancake Head Screws
- Novaflex Silicone Sealant
- 3/16” x ⅞” butyl tape
- Pop Rivet Tool and Pop Rivets
Our video that accompanies this article also shows an optional fascia wrap. A fascia wrap is a trim piece that covers and protects the exposed fascia. It is installed prior to the trim cleat and gable trim. For complete installation instructions for the fascia wrap, click here.
Gable Trim Layout For A Standing Seam Roof
The first step of this installation is to carefully plan the layout of your gable trim. For example, a standard length of trim is 10’. If your roof is 32’ wide, you’ll end up with a small 2’ piece of trim at the ridge or peak.

A better layout will begin with a 6’ piece of trim followed by two 10’ pieces of trim. Finally, you will end with another 6’ piece of trim at the ridge. A symmetrical layout will always lead to a more aesthetically pleasing look.
When planning, don’t forget to account for 6” needed for overlaps, 1” for ridge prep, and 1 ¼” needed at eave ends.
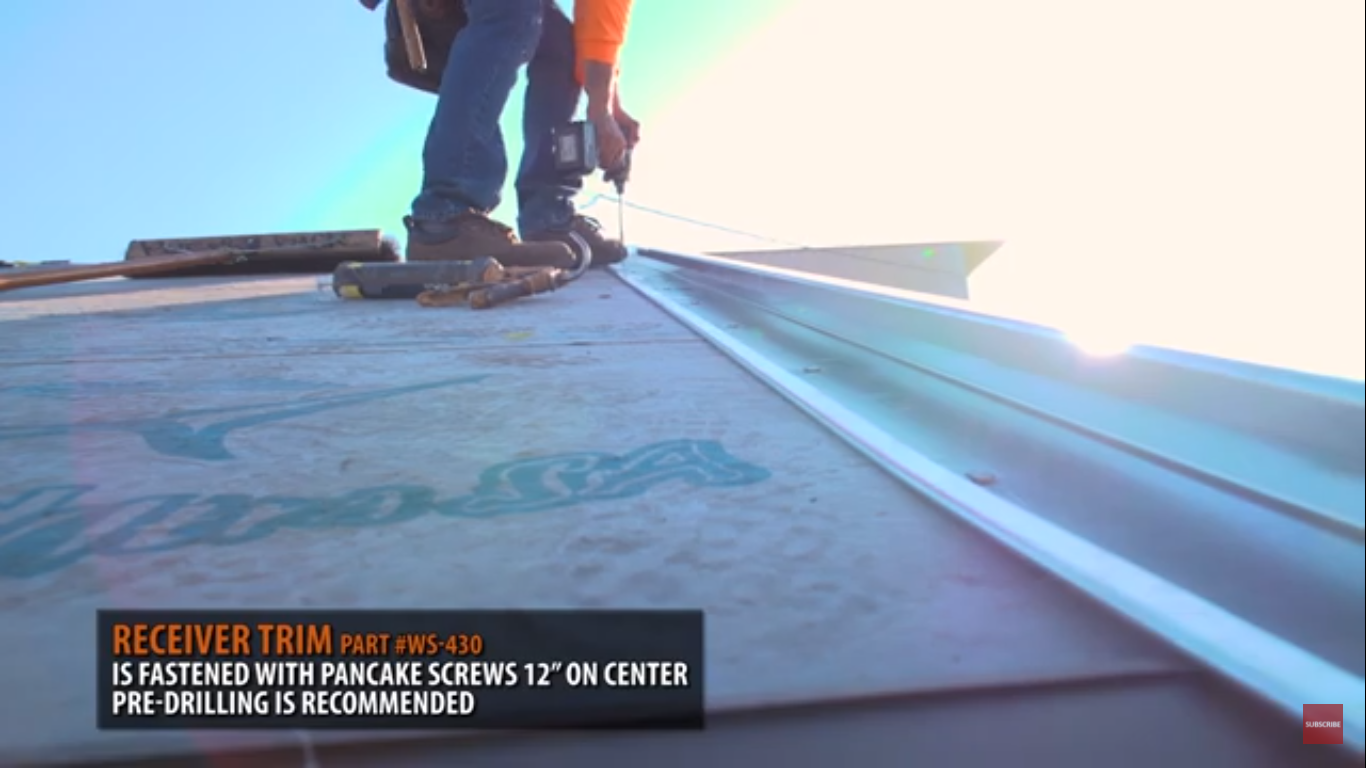
Installing Receiver Trim On A Standing Seam Roof
The receiver trim has two purposes: It holds your first and last standing seam panels in place, and it is used to fasten your gable trim.
The receiver trim is installed using pancake screws 12” on center. It’s recommended that you pre-drill your holes prior to installation.

To install:
- Cut your trim to size.
- Install flush to gable side 1” from ridgeline and flush to your eave.
- For long runs, receiver trim is butted end-to-end with no overlaps needed.
How To Install Trim Cleat
Your cleat placement will vary depending on the highs and lows of your roof. Trim cleats must also be positioned for ⅛” engagement onto the alternate trim piece kicker. This will allow the alternate trim section to hook over the receiver trim and engage the cleat.
Please note, this trim section is recommended for a professional installer only.
To install the trim cleat:
- Fasten the trim cleat with pancake screws 12” on center.
- Additional sections of trim cleat are butted end to end with no overlaps.
How To Prepare Gable At Eave
- Place gable trim in position and trace out the eave outline
- Using the outline as a guide, cut the 45 degree notch at the drip edge section only.
- Flip gable trim over.
- From the end of the cut, trace a straight line across gable trim.
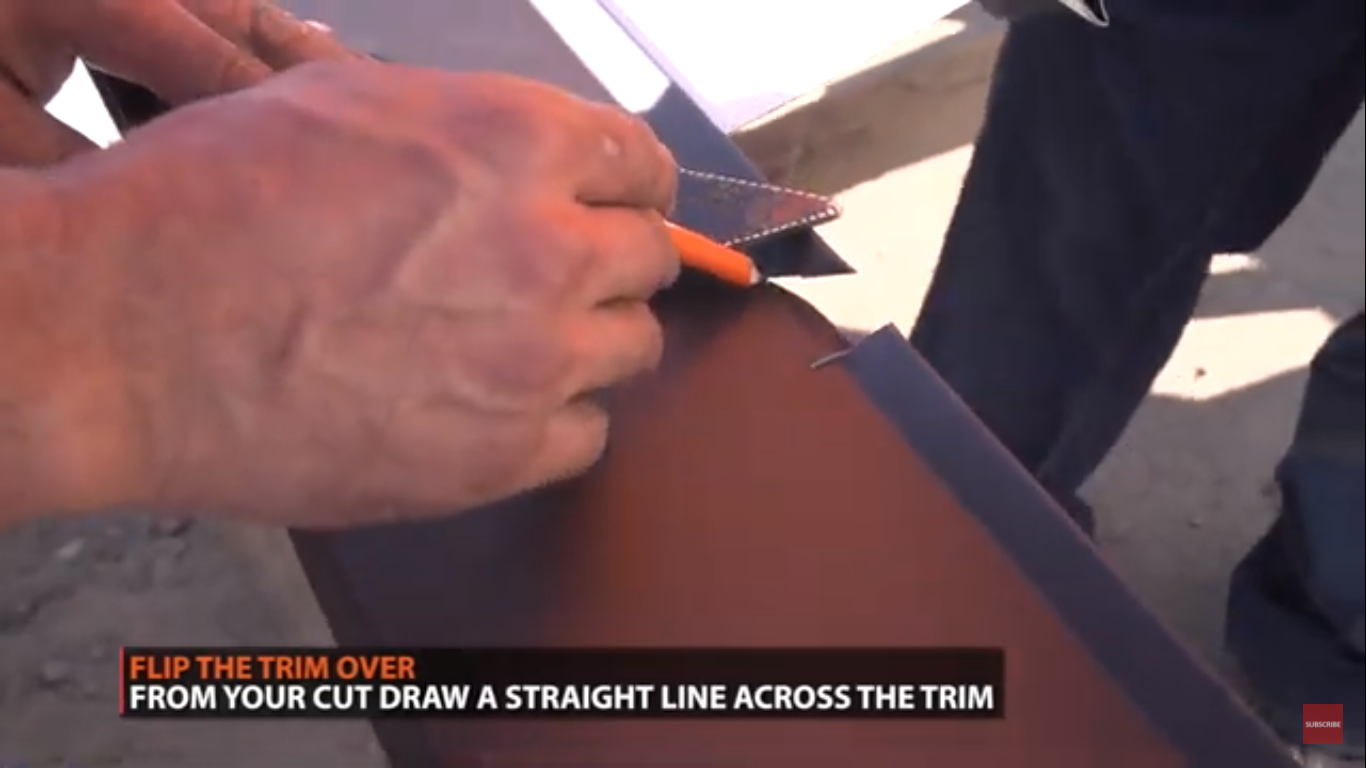
- Draw a parallel line 1 ¼” from the first mark.
- Cut gable trim along the second line.
- On both sides of the trim, cut along your inner mark to the top section.
- Cut a ½” tab on both sides of the trim.
- Notch cut the inner corner of the tab and pry open the inner hem.

- Fold tab down 90 degrees.
- A single pop rivet can be used to hold the tab in place.
How To Overlap Alternate Gable Trim
Overlaps should be six inches.
- Mark 6” onto your trim.
- At the drip edge, notch out the hem of the trim to the 6” mark.
- On the top, cut up to the 6” mark.
- Put two beads of silicone sealant on the adjacent section of trim 3” from the edge.
- Slide trim downwards into its position to prevent silicone sealant from spreading.
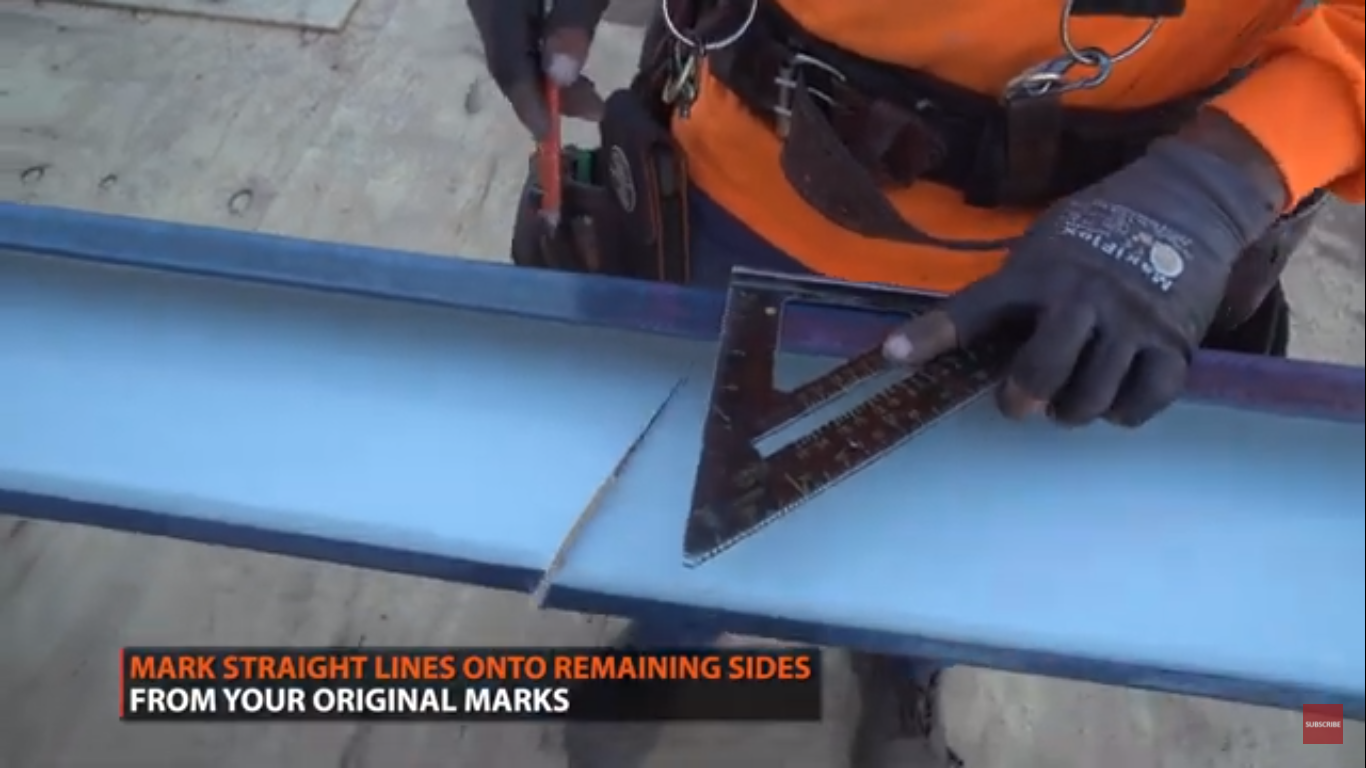
How To Prepare Gable At Peak
- Place a strip of butyl tape along the center of your receiver trim.
- Using a T bevel, lock in the angle of your roof.
- Mark the angle onto your trim.
- Mark an additional line 1” parallel to the first mark.
- Cut along your second mark.
- Mark straight lines onto the remaining sides from your original marks.
- Cut along your outer line.
- Notch cut tabs on the top and lower section of the trim by cutting the outer corners to the first mark.
- At the drip edge, cut along your first mark.
- Cut 45-degree angle to form a tab.
- Slightly bend the top tab downwards using a hand seamer.
- Place the gable section into position to ensure it lines up with the roof angle.
- Using a T bevel, lock in the angle of your roof.
- Mark the angle on the adjacent piece of trim.
- At the top section, mark a straight line. From there, mark the angle of the roof onto the backside of your trim.
- Using metal cutting snips, cut along the traced outline. PRO TIP: When cutting all sections of trim, it’s best to cut a larger section out first then carefully go back and trim at the outline.
- Place three pop rivets along the seam.
How To Fasten Gable Trim
- Wrap the gable trim around the receiver trim.

3. Secure the gable onto the receiver trim with pop rivets 12” on center.
Looking for more metal roofing installation videos? Go to our YouTube Channel and subscribe as we post new installation videos weekly!
Need More Help With Standing Seam Metal Roofing Installation?
For panels and accessories needed for your standing seam installation, go to the Western States Metal Roofing website to see our catalog, and request a quote or metal color sample as there are hundreds of colors to choose from.
Looking for more homeowner guides and step-by-step installation help? Be sure to subscribe to our Youtube channel as we release new installation videos weekly. You can also find everything you need at the Western States Metal Roofing Learning Center to help you have an easy and successful installation.


