

When installing corrugated metal roofing panels, you’ll often encounter a pitch break in your roof. Your panels will need to transition from a low to a high slope to accommodate this pitch change.
This installation article covers:
- What Is Transition Flashing?
- How Much Does Transition Flashing Cost?
- Aligning low to high transition trim
- Installing foam closures at the low of the transition
- Fastening transition trim
- Underlayment at the pitch change of a roof
- Installing foam closures at the high of the transition
- How to overlap pitch break trim
This blog has written instructions and pictures that illustrate each step. However, just in case you are a visual person we have also made an easy to follow video. The blog is only intended to support the video and the transition flashing detail from our installation guide.
Follow the instructions within the video for installing transition flashing on a metal roof.
Our staff at Western States Metal Roofing consists of friendly sales associates that have experience selling and installing metal roofing. Our goal in this article is to help you with your metal roofing project. Whether you need help with the installation of transition flashing or you need a great price on your metal roofing, we have you covered.
What’s Transition Flashing For A Metal Roof?
Transition flashing is used when you have a roof that has two different pitches. The transition trim is located where the two different pitches meet so the metal roof does not leak. Transition flashing is also referred to as pitch break trim and comes high to low or low to high.
How Much Does Transition Flashing Cost?
The cost of transition flashing will depend upon the gauge and the type of paint finish. Transition flashing will cost $1.50 to $2.50 per lineal foot.
How To Align Pitch Change Flashing On A Metal Roof
Before you begin installing your low to high transition flashing, it’s important to note:
- The bend of the trim is not meant to line up with the transition of the roof.
- The bend of the trim should be in alignment with where your roofing panels will end.
- Line up your low to high trim onto your roof and trace the outline.
- Use a dry erase marker to trace this outline so it will wipe off easily.
How To Install Foam Closures For Transition Flashing - Low Side Of Metal Roof
- Measure 1” up from the traced outline of your trim and mark a parallel line.
- Lay a strip of double sided butyl tape above this second traced line.
- Place a row of foam closures on top of your double sided butyl tape.
How To Fasten Transition Flashing
NOTE: Always remove any protective plastic from your panels prior to installation
- Place your trim in its correct location and mark a line 1 ½” from the edge on both sides of your trim.
- If you’re pre-drilling your trim, mark where your screws will fall at each high seam of your panel. Screws will be located 12” on center.
- Begin pre-drilling your screw holes.
- At the edge of the top section of trim, pre-drill a hole 1” inside and 2” from the edge on both sides of the trim.
- If overlaps are needed, don’t put a screw in the last 12” until overlap is done.
- Prior to fastening the pitch break trim, place silicone sealant on top of the foam closures.
- Align your panel making sure pre-drilled holes align with the high seams of corrugated metal roofing.
- Secure the panel in place with 2 pancake screws on each end of the top section of your trim.
- Fasten the transition trim to your panel using lap screws with a sealing washing at the pre-drilled holes. Remember to make sure your screws penetrate the high seam of the roofing panel and foam closure.
- Secure top section with pancake screws 12” apart and 2” from the top edge.
NOTE: The location of your screws may vary depending on the width of the side trim you will be installing. You don't want a screw to fall under the side trim.
How To Install Underlayment At Pitch Change Of Metal Roof
- Wipe off all dust and debris from the top section of your underlayment.
- If you have gaps at the ends of the trim, these can be covered with self adhesive underlayment.
- Place an 8” strip of self adhesive roofing underlayment 3” from the transition trim.
How To Install Foam Closures For Transition Flashing - High Side Of Metal Roof
- A strip of double sided butyl tape should be placed at the edge of your 8” strip of roofing underlayment.
- When laying out the top section of roofing panels, make sure they are not only squared but that the corrugations line up with the lower section of the corrugated roofing panels.
- Install foam closures on top of the butyl tape.
- Make sure that the foam is aligned with the corrugations of the roofing panel.
- Mark each side of your roofing panels 1 ½” from the edge and then snap a chalk line. This will ensure that your screws go on straight and penetrate the foam closures.
- Place silicone sealant on your foam closure prior to your installation.
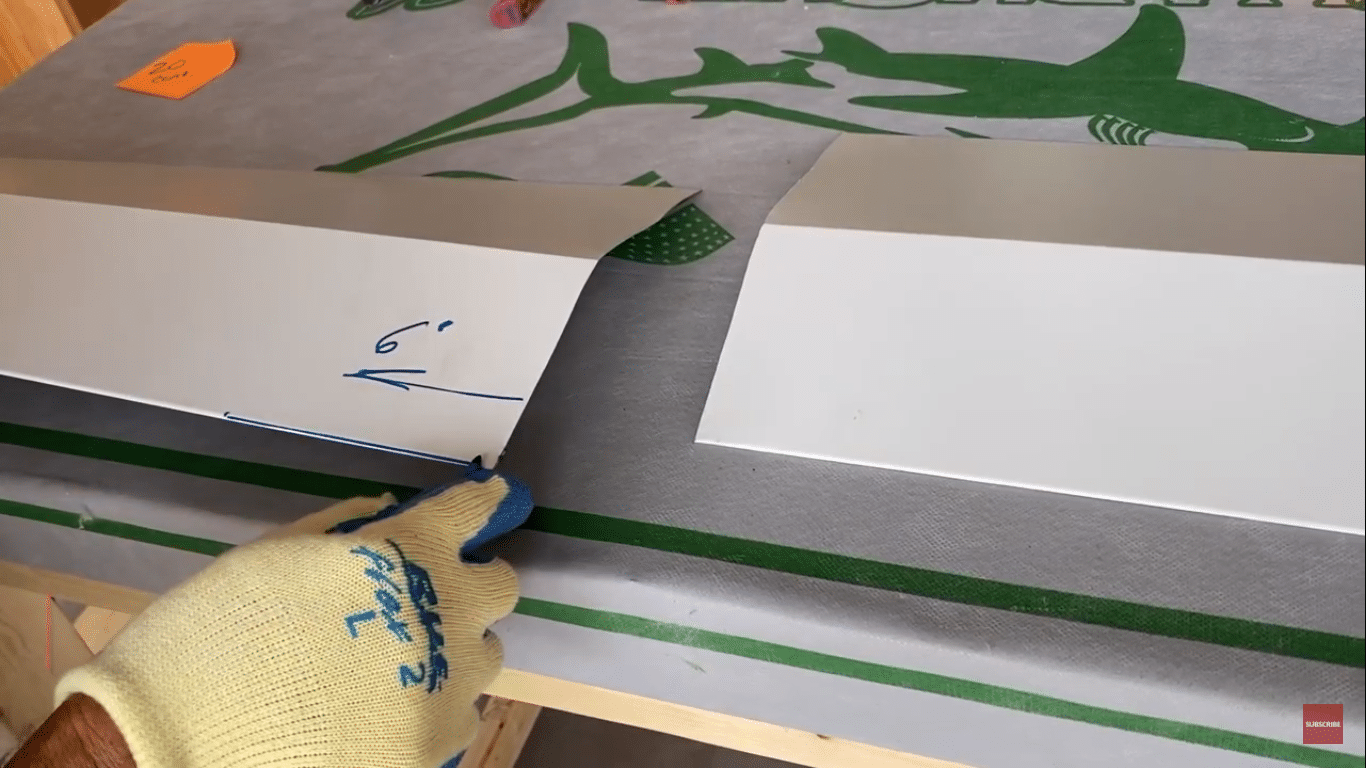
How To Overlap Transition Trim
Before you begin, know that any overlap should be a minimum of 6”.
- Mark the edge of your trim 6”.
- Slightly pry open the hem up to 6” mark.
- Using metal cutting snips, notch out the hem up to the 6” mark.
- Pry open the hem of the adjacent piece up to 6” inward.
- Two lines of silicone sealant should be placed on the under section of the overlap.
- When connecting the two sections, it’s best to push the section upwards into its position to prevent smearing the silicone sealant.
Do you need to install a high to low transition flashing?
Check out this metal roofing installation video.
Have You Purchased Your Panels? Buy Direct And Save
Looking to save some cash on your metal roofing project? Western States Metal Roofing is a manufacturer that sells direct to homeowners and contractors. This can help you save 15% to 50% percent on all of the metal roofing materials you’ll need for your house.
Go to the Western States Metal Roofing website to see our catalog and request a quote or metal color sample as there are hundreds of colors to choose from.

Looking for more homeowner guides and step-by-step installation help? You can find everything you need at the Western States Metal Roofing Learning Center to help you have an easy and successful installation.
