

You’re ready for warm weather and entertaining in your backyard, but there are a few changes you want to make to have your outdoor space look as inviting as possible for your guests. That could be anything from buying new patio furniture, doing some gardening, or finally figuring out what to do about that eyesore of a wall in your backyard.
It’s common to see structural walls made of stucco and concrete in residential outdoor spaces. It’s also common to not want to see them.
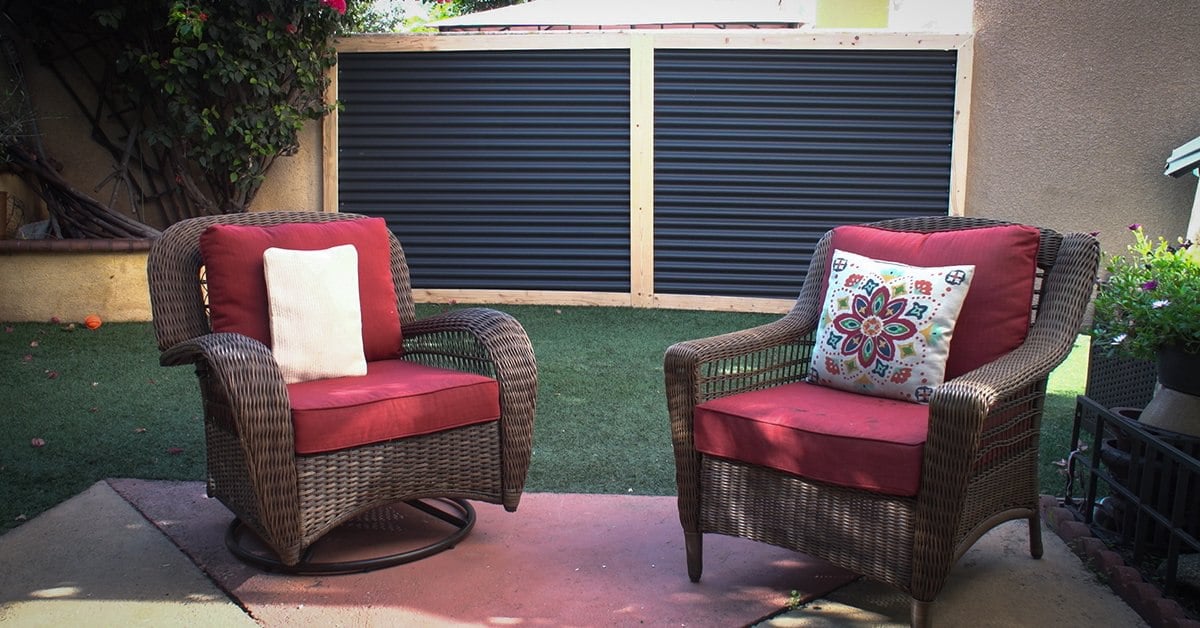
If you have an unsightly exterior wall in your backyard and are looking for a simple project that will make a big difference in your outdoor space, look no further than a metal accent wall.

Outdoor Metal Accent Wall Using ⅞” Corrugated Metal Panels In Black Ore Matte
This DIY project is a facade treatment that adds character to your backyard while also hiding an ugly looking structural wall.
The metal panels we manufacture at Western States Metal Roofing are predominantly used for roofing or siding. However, metal panels can also be used in more creative ways for your home such as for a ceiling or a fence. In this article, we are going to give you the step by step process of how to use metal panels as an accent wall.
You can see Western States Metal Roofing’s own metal accent wall installation that we use as an example throughout the article by watching the video below:
Tools And Supplies Needed For Metal Accent Wall Installation
For this project the essential tools you will need are:
- A Drill
- Screw Gun
- Wood Saw
- Concrete Anchors with a Concrete Drill Bit
- Speed Square
You’ll also need these supplies:
- ¼ inch by 1 and ¼ inch Washers
- ¼ inch Spade Drill Bit
- #12 by ¾ inch self-drilling screws
- #8 by 1 ½ inch wood screws
- Concrete Anchors with a Concrete Drill Bit
- Wood for a support frame
- Metal panels
Building A Wood Support Frame
You will need the material to build a support frame. For our project, we constructed a support frame out of wood. The sizes and quantity will vary depending on your build.
We built a 6 foot high by 14 foot wide wall using the following materials:
3 - 1inch x 6 inch x 8 foot. common boards
5 - 1 in. x 2 in. x 8 ft. common boards
6 - 1 inch by 4 inch by 8 foot boards for exterior framing.
There are a variety of wood options you can use for the framing depending on the look you want and what tone best matches your outdoor space. In our example in the video, we went with a bare, neutral wood tone.
Choosing Your Metal Panels
If you’re building a metal accent wall, of course you’re going to need metal panels.
The simplest and most cost-effective option is to buy your panels at your local home improvement store. There, you can find your standard 8 by 14 foot, 29 gauge panels. The biggest downside to using one of these stores is limited color and panel choices.
Home improvement stores carry the standard, conventional colors. If you’re looking for more design options and want a large selection of colors and finishes to choose from, we suggest looking through color charts for design ideas. In addition to all of the traditional colors, we also carry panels in unique finishes that you won’t find anywhere else.
How To Build A DIY Metal Accent Wall
Step 1: Weather Seal Your Wood Boards
Prior to installing your wood, you will want to weather seal your wood boards using a proper sealant to protect them from the elements. This protects them from rotting.
Step 2: Measuring Your Wall
Measure your wall so you know how much you need to cut your materials.
For our example, we built an accent wall that is 6 feet high and 14 feet across. You can use the basics in our video to scale up or down to your desired wall size.
Step 3: Building The Support Frame
The foundation of this project is the support frame.
Start by cutting your 3 wood boards down to the length that matches the height of the wall you are building.
Then, anchor the 3 boards to the wall using concrete anchor screws, 6 inches from the top and bottom of each piece. A third anchor should be added to the middle of each panel for additional support.
Start by pre-marking your wood pieces at each anchor location.
Then using your ¼ inch drill bit, that came with the anchor screws, drill a hole at each mark.
Next using your spade drill bit, carve out a ¼ inch notch at each mark. This will allow the screw and washer to fall flush into the beam when mounting.
Step 4: Mounting The Support Frame
Once the wood beams are ready, it’s time to start mounting them.
Prepare your drill with the drill bit that came with your anchor screws. Make sure to set the drill bit to the suggested depth from the concrete anchor’ss manufacturer guidelines.
Make sure to compromise for the thickness of the wood panel. Using a pre-drilled wood beam as a guide, begin at one side of your wall. You want to make sure that your wood panel is firmly to the ground.
Begin drilling into your stucco or cinder block at each hole.
Once you’ve drilled your holes, it's time to place the anchors.
Place a ¼ inch washer on each screw prior to fastening them. Make sure that the screws go on securely.
There may be a chance that you hit a pocket in the wall or cinder block which will result in the screw not grabbing onto anything. If this happens, you will need to redrill a second hole either above or below your failed screw.
It is crucial that you follow the screw manufacturer guidelines as this will be the main support for your wall.
Now that your first board is installed, you’ll want to measure from first board out to where your wall will end. You’ll then repeat the process to install the 2nd support beam on the opposite end of the wall.
Nex,t measure the distance between the two beams and find the center point. Here you will install a 3rd beam.
Proper sealant should be placed around the edge of your boards. The sealantt can be placed around each anchor screw.
Step 5: Add Wood Frame Spacers
Now that all three support beams are up, it’s time to add wood frame spacers. These will act as spacers between your support beams, metal panels, and the final wood frame.
They should be placed where the white lines are as seen below:

They will be fastened to your support beams using #8 x 1 ½ inch wood screws.
Step 6: Installing Metal Panels
The panels need to be cut down to size. There are numerous ways to properly cut metal panels. We recommend using Electric Metal Shears as it’s one of the easier methods.
Once the panels are cut to size, mount them to your support frame using #12 by ¾ inch self-drilling screws.
We recommend drilling to the low seam of the panel, at every 3rd corrugation. Screws should be approx 1” from the edge so that they are concealed by the final frame.
Step 7: Installing The Wood Frame
The last step is to install your wood frame. This is the material that borders your metal panels. When choosing your wood for the frame, consider how it will look against the metal panel color you chose. You can also seal and paint the wood if you prefer not to use a natural, bare wood look.
The wood for the frame needs to be cut down to size. We recommend using your speed square to cut at a 45-degree angle as this achieves a more polished appearance.
After the frame is cut to size, attach the frame using #8 x 1 ½ inch wood screws.
Once the frame is attached, your project is complete and you can admire your new, beautiful metal accent wall.
Choosing The Right Metal Panels For Your Accent Wall
Now you’re ready to enhance the beauty of your outdoor space with a metal accent wall! You just have to pick out the color of the metal you’re going to use.
Just like when choosing a roof color, we recommend that you look around at the surroundings in your backyard to see what colors will match best. The color of features such as gates, fencing, landscaping, and other nearby surroundings should be considered.
To get started on designing your new backyard statement piece, take a look at our color catalog to see all the design options available for you.
Download Metal Panel Color Catalog

